I have now finished my animation. I edited the camera, from the last render, to appear much smoother than before. I have also improved on the lighting within the scene, although it is still too bright in some areas. Below is a link to the video, uploaded to YouTube:
I decided to edit some of the render settings before batch rendering, such as increasing the quality to hd, and widescreen.
Tuesday, 17 January 2012
Sunday, 15 January 2012
Rendered Animation - The first one
Even though I am strapped for time, I am still going to create another render after this one. Here is the current animation:
I am happy with the animation itself, but I am not so keen on the camera. The camera is currently too fast, it makes me sea sick! So for the final render, the camera is going to be nice and smooth. The other issue I did not notice until rendering is the current lighting, its too dark in some places and way to light in other (i.e the start of the animation...a bright white microwave). I have already sorted the lighting ready for the final render.
Learning Outcomes
Other than that, I think its really good, and I think I have achieved quite a lot while developing this animation, I have learnt a lot of new skills, such as adding light, painting skin weights, rigging, smoothing effectively with edge loops, texturing, UV mapping, use of IK handles etc. and I feel a lot more confident when using Maya 2012.
Animation Update
There is something I forgot to mention within this blog, which I feel needs to be. When I started animating my character, over a week ago, I realised how difficult the walk cycle is, and also how time consuming it would be to animate the walk cycle across the whole kitchen. So, I decided to edit the story slightly, and modelled a skateboard.
 A render image of the start of the animation, showing the mouse on the skateboard.
The mouse starts on the skateboard, and loses it towards the end, when he catches fire on the hob.
 A render image of a frame where the mouse loses his skateboard.
There is still a walk cycle, towards the end of the animation, just at a much smaller scale than first planned.
 A render image showing the mouse during its walk cycle, towards the end of the animation.
As you have probably noticed from the above screenshots, I have also, finally, added eyes and a mouth. I originally wanted to create a blend shape to act as the mouth, of which I would be able to edit throughout the animation, to show pain (hob fire) and happiness (reaches the cheese). Unfortunately, I had forgotten how to create a blend shape, from our lesson on it back in October. I tried to find tutorials online, but they were not much help. A face rig was out of the question, way to completed for me. So, once the animation was complete, I thought to myself, how am I going to show emotion? I then, very cleverly, decided to extrude a few faces on the head of the mouse, to form the mouth.

I also added a blue texture to two faces, extruded those faces, and added a black texture within the blue one, to show eyes. Unfortunately, this means that the mouse is constantly smiling, even when he catches fire on the hob, but it still does the trick. From this, I have learnt to pay more attention when being taught new tools, and I have since learnt a bit more about blend shapes.
I decided to show the happy face at the end of the animation, when the mouse reaches the cheese. I zoomed in the camera towards the face, to further emphasise his happiness, his emotion.

The mouse starts on the skateboard, and loses it towards the end, when he catches fire on the hob.

There is still a walk cycle, towards the end of the animation, just at a much smaller scale than first planned.

As you have probably noticed from the above screenshots, I have also, finally, added eyes and a mouth. I originally wanted to create a blend shape to act as the mouth, of which I would be able to edit throughout the animation, to show pain (hob fire) and happiness (reaches the cheese). Unfortunately, I had forgotten how to create a blend shape, from our lesson on it back in October. I tried to find tutorials online, but they were not much help. A face rig was out of the question, way to completed for me. So, once the animation was complete, I thought to myself, how am I going to show emotion? I then, very cleverly, decided to extrude a few faces on the head of the mouse, to form the mouth.

I also added a blue texture to two faces, extruded those faces, and added a black texture within the blue one, to show eyes. Unfortunately, this means that the mouse is constantly smiling, even when he catches fire on the hob, but it still does the trick. From this, I have learnt to pay more attention when being taught new tools, and I have since learnt a bit more about blend shapes.
I decided to show the happy face at the end of the animation, when the mouse reaches the cheese. I zoomed in the camera towards the face, to further emphasise his happiness, his emotion.
Saturday, 14 January 2012
The Drawbacks
Ok, so this is my most recent drawback, and its a pretty serious one. I have added a camera, selected a viewport to show what the camera is aiming at, and the image below is what I get. Clearly, the camera has messed up somewhere along the lines, and I have no idea how to correct it.
 I eventually corrected the issue by simply deleting the camera, and adding a new one. The new camera seemed to work fine.
Below are some images of the mouse character with deformation within its body. These images were taken before I applied the skin weights, at a time when I was unsure how to utilise the paint skin weight tool.
 This screenshot shows some of the deformation I encountered when moving the right arm downwards. Note the highlighted area, where the skin moves inwards. To fix this, I added some influence via skin weights tool under, and around the arms.
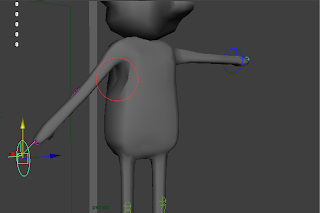
 This image shows the deformation of the arm itself, when I moved it too close towards the body. The arms twists itself (highlighted areas) and the mouse head also sags to the right a bit. To fix this, I simply added skin weights to the arm itself, and to the head.
 This image shows an joint issue I once had, with the left arm. This is due to myself forgetting to bend each limb before applying joints and rigging it. To overcome this, I had to learn how to set limitations for each joint. I tried using the lattice tool, to bend the arm slightly, however maya would not show the vertices within the lattice tool.
 This image shows a similar problem as the one above, except in the right leg. As I moved the right leg up slightly, to cause a bend, the knee joint moved too far outwards, towards the right. I simply set limitations on that joint to prevent it from happening again. These little 'hiccups' simply taught me how not to model and rig a character, and has given me a greater understanding on how to do so.
 This image shows some of the skin weights I painted on the body of the character. At this stage I was still learning about skin weights, such as what colour represented each amount of influence. I learnt an awful lot from friends, colleagues and many tutorials online, about paiting skin weights, and I personally feel I have come along way in terms of character rigging at this point, now that I understand how skin weights work.
There is another problem that I have had to deal with from the begining, which is aparently common within Maya 2012. I have been unable to render a single frame, without the use of a code that I have had to include within the MEL script editor. This piece of code only worked until I closed the current scene, if I reopened the scene, I would have to re enter the code. This has been just a mere nuisance though, as it is quite easy to fix (I saved the code into a notepad doc, so I can simply copy it into the MEL script editor within seconds).

This image shows a screenshot of the code I have had to re enter into the MEL script editor to render frames, everytime I re opened the scene. Fun!

Below are some images of the mouse character with deformation within its body. These images were taken before I applied the skin weights, at a time when I was unsure how to utilise the paint skin weight tool.


There is another problem that I have had to deal with from the begining, which is aparently common within Maya 2012. I have been unable to render a single frame, without the use of a code that I have had to include within the MEL script editor. This piece of code only worked until I closed the current scene, if I reopened the scene, I would have to re enter the code. This has been just a mere nuisance though, as it is quite easy to fix (I saved the code into a notepad doc, so I can simply copy it into the MEL script editor within seconds).

This image shows a screenshot of the code I have had to re enter into the MEL script editor to render frames, everytime I re opened the scene. Fun!
The Extra Bits
Once I completed the animation of the mouse, I realised something, I forgot to model cheese! So below is an image of the cheese I modelled last minute. The texture is a simple yellow. I modelled it from a cube, moved the verts towards each other on the front of the model to show a wedge effect, and extruded holes into the model.

I have also decided to add some more last minute models, to make the scene that little bit more interesting. Below is an image of a toaster I created, and toast within the toaster. Both were created with reference images (all reference images will be uploaded soon...ive misplaced some of them).
 The toaster will have some input into the final animation. Once the mouse reaches the cheese, and the camera slowly pans out, this toaster will pop out the toast. Its a very simple idea to implement, but im simply trying to add more to the animation.
I have also modelled a carton of milk. This may sound random, but I originally wanted to fill the fridge I modelled with loads of objects, that would generally be found in a fridge. Unfortunately, the scene is way too big already, and adding the milk (along with the two objects above) added an additional 600KB! So yeh, theres just milk in the fridge :D
 One more thing to add to 'The Extra Bits' is the microwave. This was the very first object I modelled, apart from the start of the character itself, and I have somehow forgotten all about up until I started animating, and realised something was missing. Here it is, textured, at the start of the animation:

Forum support
I also took part in a student forum while developing this animation, within the glyndwr site. I posted a topic about some last minute texturing, providing links to some great texture tutorials for the likes of wood and water, all of which I used for my own project, and thought were very effective. Below is a screenshot of my post:


I have also decided to add some more last minute models, to make the scene that little bit more interesting. Below is an image of a toaster I created, and toast within the toaster. Both were created with reference images (all reference images will be uploaded soon...ive misplaced some of them).

I have also modelled a carton of milk. This may sound random, but I originally wanted to fill the fridge I modelled with loads of objects, that would generally be found in a fridge. Unfortunately, the scene is way too big already, and adding the milk (along with the two objects above) added an additional 600KB! So yeh, theres just milk in the fridge :D


Forum support
I also took part in a student forum while developing this animation, within the glyndwr site. I posted a topic about some last minute texturing, providing links to some great texture tutorials for the likes of wood and water, all of which I used for my own project, and thought were very effective. Below is a screenshot of my post:

Wednesday, 11 January 2012
Completed Kitchen Enviornment
Below are some images of the kitchen environment. I have textured everything within the scene, mainly with blinn and lambert properties.


Monday, 9 January 2012
Mouse - smoothed
Below are some screenshots of my mouse character, smoothed. I had recently noticed that my previous screenshots of my mouse have been unsmoothed, so I have now rectified the problem. Looks a lot better now :D


I am still in the rigging stage of this mouse, as I have spent most of my attention on the environment. I have come across a few problems while attempting to rig this mouse, including deformation of the skin. I am unsure how to utilise the paint skin weights tool effectively; which is my next task. More updates on that soon. He might have a tail soon, too, might.


I am still in the rigging stage of this mouse, as I have spent most of my attention on the environment. I have come across a few problems while attempting to rig this mouse, including deformation of the skin. I am unsure how to utilise the paint skin weights tool effectively; which is my next task. More updates on that soon. He might have a tail soon, too, might.
Subscribe to:
Posts (Atom)